


How to Remove Background Noise in CapCut



Whether you're editing a vlog, YouTube video, podcast clip, or social media reel, background noise can quickly ruin an otherwise great recording. Wind, traffic, keyboard clicks, air conditioners, and room echo often make dialogue hard to understand.
Fortunately, CapCut includes a built-in Noise Reduction feature that can clean up many common background sounds in just one click. In this guide, you'll learn how to remove background noise in CapCut on desktop, mobile, and online, plus what to do if the built-in tool isn't enough.
Can CapCut Remove Background Noise?
Yes. CapCut includes a built-in Noise Reduction feature that can automatically reduce common background sounds, making speech clearer without requiring advanced audio editing skills. Whether you're editing YouTube videos, TikToks, podcasts, interviews, or online meetings, it's a quick way to clean up noisy recordings.
The feature works well for steady, low-level background noises such as:
- Fan or air conditioner hum
- Computer or HVAC noise
- Light traffic or street ambience
- Keyboard clicks and mouse sounds
- Low electrical hiss or static
However, like most one-click AI denoisers, CapCut has its limits. It may struggle with complex audio, including strong wind noise, room echo, multiple people talking at once, or loud background music. Applying aggressive noise reduction can also make voices sound slightly muffled or robotic.
If your recording only has mild background noise, CapCut's built-in tool is usually enough. For more challenging audio or projects where voice quality is critical, such as interviews, tutorials, podcasts, or professional content creation, you may need a dedicated AI audio denoiser that offers finer control over the denoising process.
How to Remove Background Noise in CapCut Desktop
CapCut Desktop includes a built-in Reduce noise feature that automatically suppresses common background sounds, making spoken audio cleaner without requiring any advanced editing skills. Here's how to use it.
Step 1. Import your video.
Open CapCut Desktop and create a new project. Click Import to add your video, then drag it onto the timeline.
Step 2. Open the Audio panel.
Select the video clip on the timeline, then click the Audio tab in the right-hand properties panel. This is where you'll find CapCut's audio editing tools, including voice enhancement, noise reduction, and voice isolation.
Step 3. Turn on Reduce noise.
Scroll down and enable Reduce noise. CapCut will automatically analyze the audio and reduce common background sounds such as fan hum, keyboard clicks, air conditioner noise, and light ambient noise.
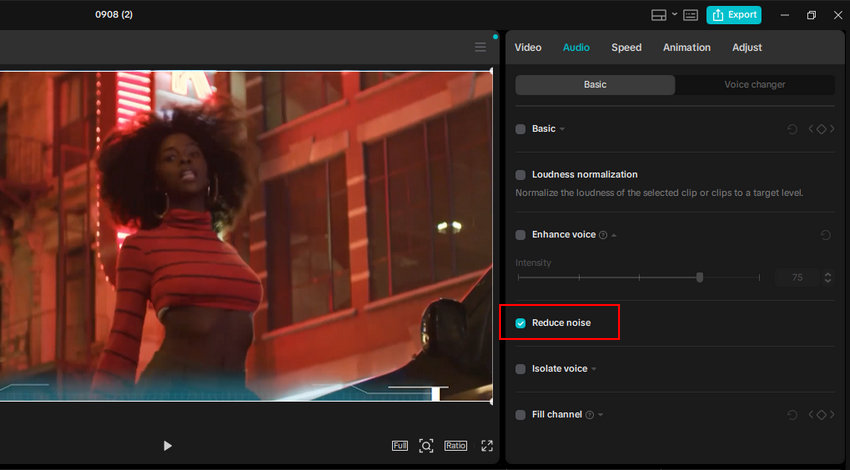
For recordings that contain speech, you can also enable Enhance voice. This feature is designed to reduce echoes, popping sounds, mouth clicks, and other unwanted noises while making voices sound clearer and more prominent.
Step 4. Preview the result.
Play your video and listen to the processed audio. Compare it with the original to make sure the background noise has been reduced without affecting voice clarity. If the voice sounds unnatural, try disabling Enhance voice or using only Reduce noise, depending on your recording.
Step 5. Export the cleaned video.
Once you're satisfied with the result, click Export, choose your preferred output settings, and save the video.
How to Remove Background Noise in CapCut Mobile
CapCut Mobile also includes an Reduce noise feature that can suppress common background sounds and improve voice clarity. However, unlike the desktop version, this feature is currently available only to CapCut Pro subscribers. If you're using the free version, you'll see a Pro badge next to the option.
Step 1. Import your video.
Open the CapCut app on your Android or iPhone, tap New Project, and import the video you want to edit.
Step 2. Open the Edit menu.
Tap the video clip on the timeline, then tap Edit from the toolbar at the bottom of the screen.
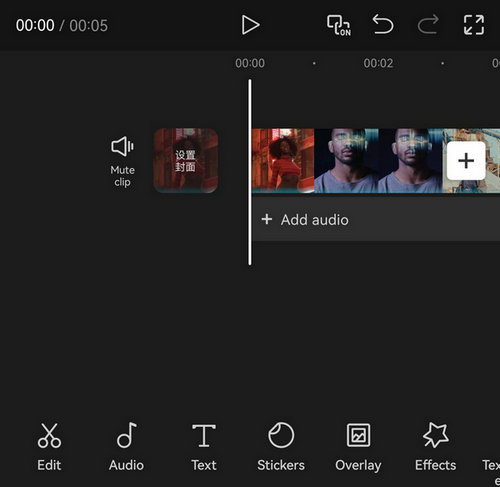
Step 3. Find and enable Reduce noise.
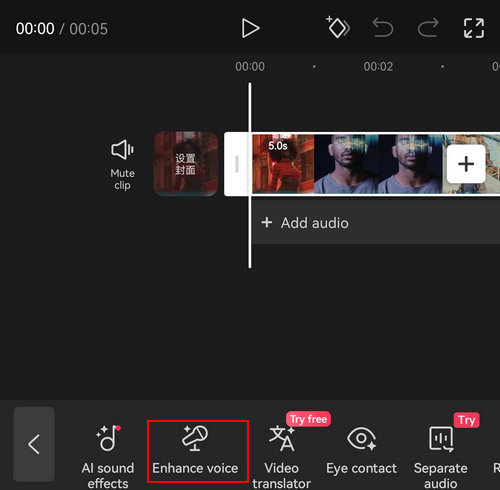
Swipe the editing tools to the right until you find Reduce noise (premium feature). Tap it and turn the feature on. CapCut will automatically reduce steady background sounds such as fan hum, air conditioner noise, keyboard clicks, and light ambient noise.
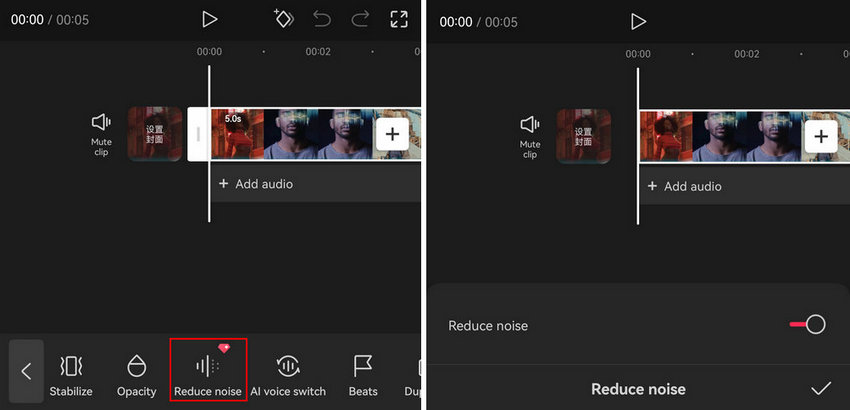
If your recording contains spoken dialogue, you can also enable Enhance voice. This feature helps improve speech clarity by reducing echoes, mouth clicks, and other voice-related distractions.
Step 4. Preview the result.
Play the video to hear the processed audio. Check whether the background noise has been reduced while keeping voices clear and natural.
Step 5. Export the video.
Once you're satisfied with the audio quality, tap Export in the upper-right corner to save the edited video.
Note: The location and availability of Reduce noise may vary slightly depending on your CapCut app version and region. If you don't see the feature, update the app to the latest version and verify whether it's included in your current subscription plan.
How to Remove Background Noise in CapCut Online
If you prefer editing in a web browser, CapCut Online also includes an Noise reduction feature. Similar to the mobile app, however, this feature is available only to CapCut Pro subscribers.
Step 1. Upload your video.
Open CapCut Online in your browser, sign in to your account, create a new project, and upload the video you want to edit.
Step 2. Select the video clip on the timeline.
Drag your video onto the timeline, then click the clip. Once it's selected, the editing options will appear on the right side of the editor.
Step 3. Open the Audio settings.
Click the Audio tab in the right-hand panel. A pop-up window will appear with several audio controls, including volume, fade in/out, and Noise reduction.
Step 4. Turn on Noise reduction.
Toggle Noise reduction to enable background noise removal. CapCut will automatically suppress common noises such as fan hum, air conditioner noise, keyboard clicks, and other steady ambient sounds.
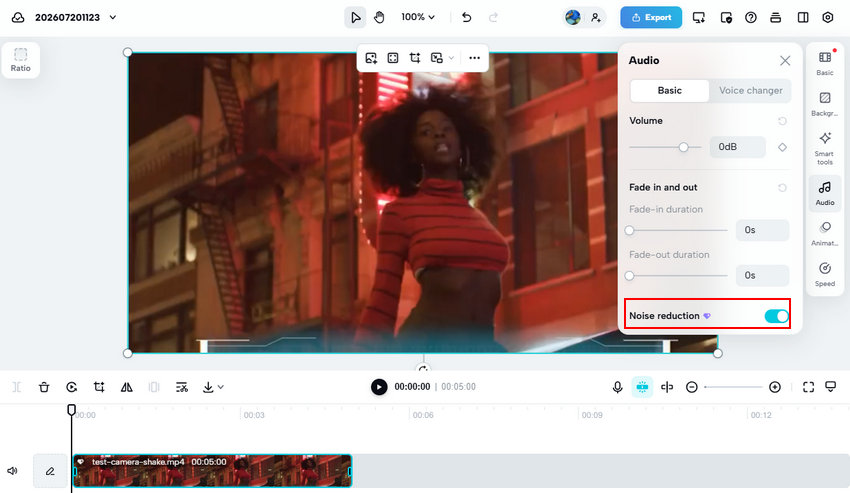
Noise reduction is a pro feature. You need an active CapCut Pro subscription before you can apply the effect.
Step 5. Preview and export your video.
Play the video to check the result. Once you're satisfied with the audio quality, click Export to save the processed video.
Why Is CapCut Noise Reduction Not Working?
If CapCut's Noise Reduction feature isn't producing the results you expected, don't worry. In many cases, the problem isn't a software bug but a limitation of the feature itself or the type of audio you're working with. Here are some common reasons and how to fix them.
The Noise Reduction option is missing.
First, make sure you're using a version of CapCut that supports the feature. On CapCut Mobile and CapCut Online, Noise Reduction is currently a CapCut Pro feature. On Desktop, the available audio tools may vary depending on your software version. Updating CapCut to the latest release may restore missing features.
The background noise is still noticeable.
CapCut works best on steady background sounds such as fan hum, air conditioner noise, keyboard clicks, and light ambient noise. More complex sounds, including strong wind, heavy traffic, multiple speakers, or loud background music, are much harder for a one-click AI denoiser to remove completely.
Your voice sounds muffled or unnatural.
Aggressive noise reduction can sometimes remove parts of the human voice along with the background noise. If you've also enabled Enhance Voice, try turning it off and compare the results. Using only one enhancement feature may produce more natural-sounding speech.
The recording contains echo or reverb.
Room echo is different from background noise. Once reverberation has been recorded, it's much more difficult to remove cleanly. CapCut can improve some recordings, but it isn't specifically designed for advanced echo removal.
You need more control over the denoising process.
CapCut applies noise reduction with little or no manual adjustment, making it ideal for quick edits but less suitable for difficult recordings. If your audio contains persistent hiss, strong wind noise, or other challenging artifacts, a dedicated audio denoiser can often produce better results.
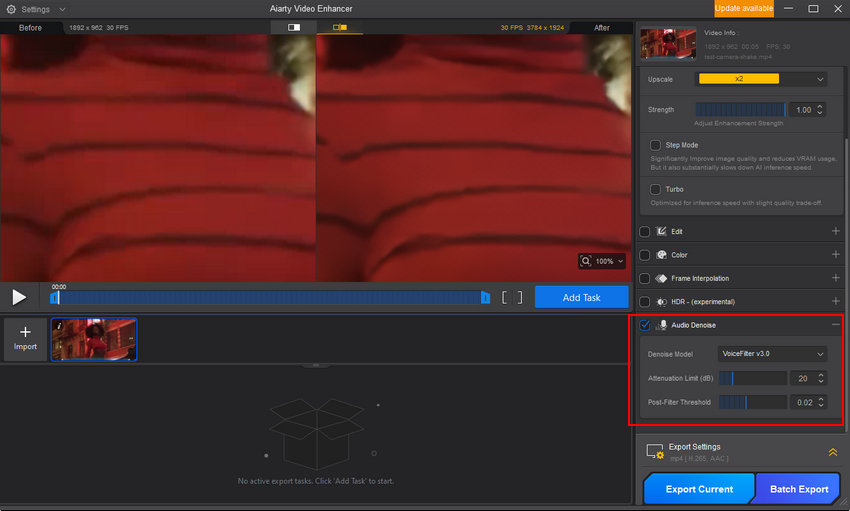
For example, Aiarty Video Enhancer includes a dedicated Audio Denoise module with the VoiceFilter v3.0/3.1/RNNoise CPU AI model, allowing you to fine-tune settings such as Attenuation Limit and Post-Filter Threshold. This gives you greater control over how much background noise is removed while helping preserve natural voice quality, especially for interviews, podcasts, tutorials, and other speech-focused content.
Beyond audio cleanup, Aiarty Video Enhancer also serves as an all-in-one AI video enhancement solution. It can upscale videos to higher resolutions, reduce visual noise and compression artifacts, sharpen blurry footage, restore facial details, increase frame rates through AI frame interpolation, and enhance overall video quality. This allows you to improve both the audio and visuals in a single workflow instead of switching between multiple applications.
 FAQs about Removing Background Noise in CapCut
It depends on which version of CapCut you're using. On CapCut Mobile and CapCut Online, Noise Reduction is currently a CapCut Pro feature. If you're using the free version, you'll be prompted to upgrade before applying the effect. On CapCut Desktop, feature availability may vary depending on your version and region.
CapCut can reduce mild wind noise, but it isn't designed to eliminate strong wind interference. Because wind often overlaps with the same frequency range as human speech, aggressive noise reduction may also affect voice quality. For recordings with heavy wind noise, a dedicated AI audio denoiser usually produces better results.
This usually happens when the AI removes parts of your voice along with the background noise. If you've enabled multiple audio enhancement features, such as Enhance Voice and Noise Reduction, try turning one of them off and compare the results. Excessive processing can sometimes make speech sound less natural.
Not completely. CapCut's AI Noise Reduction is primarily designed to suppress background noise rather than remove room echo or reverb. If your recording was made in a large or reflective space, some echo will likely remain after processing.
Yes, if the recording contains only mild background noise, AI tools can usually clean it up while keeping voices clear. However, recordings with strong wind, loud traffic, background music, or heavy echo are much more difficult to restore. Using software that provides adjustable denoising controls often produces more natural-sounding speech than a one-click solution.
You May Also Like


This post was written by Ashley Brown, a videographer turned AI explorer. As an associate writer at Digiarty Software, she dives into the latest AI-powered tools for video enhancement and content creation, offering practical insights and unbiased commentary. Accuracy confirmed by Abby Poole.
